San Jose Cabinet Refinishing involves a thorough surface preparation process and the application of a new finish. It’s an excellent option for homeowners who want to refresh the look of their kitchen without spending a fortune.
However, there are a few important things to consider before choosing this project. First and foremost, refinishing will not solve underlying problems like split Rigid ThermoFoil doors.
Cabinet refinishing is a less expensive option for homeowners who wish to give their kitchen a facelift. It can cost up to half the price of cabinet replacement and still offers a great return on investment, adding significant value to your home. However, refinishing requires extensive preparation and time commitment to achieve the best results. For this reason, many homeowners turn to professional help. Choosing a reputable service with a proven record will ensure the quality of your project.
A professional cabinet refinisher will typically charge between $35 to $75 per hour for labor. The overall cabinet refinishing cost will depend on the type of materials used and the complexity of the design. For example, cabinets with intricate trim, carving or detailing will require more work to refinish than simple wooden doors and drawer fronts. Labor pricing will also vary depending on geographic location.
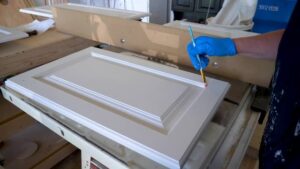
The first step of the refinishing process is to prepare the cabinet surfaces. This involves taping off floors and counters, adding drop cloths, stripping paint or stain from the doors and drawer fronts and repairing any holes or cracks. A good refinisher will take the time to do this properly to prevent any future problems.
In addition to painting, refinishers can also add finishing touches like glazing or distressing. These techniques can be added to the finished product at an additional cost. Glazing will create a shiny surface that highlights details in the wood, while distressing will create an aged or weathered look.
Refinishing is a great choice for wood cabinets, but it is not recommended for thermofoil or laminate doors and drawer fronts. These materials are not porous and do not accept new stain or paint well. Refinishing can be done, but it will be very difficult to achieve a good result.
While it may be tempting to DIY your cabinet refinishing project, this can be dangerous and costly. Professionals have the proper equipment and training to ensure a job that is both safe and effective. They also use high-quality products that are moisture, chemical and abrasion resistant. This ensures your cabinets will last for years to come.
Time
Cabinet refinishing is the process of refreshing and revitalizing your kitchen cabinets through the application of new finishes, usually paint or stain. It requires careful surface preparation to transform the existing wood cabinetry and to preserve its structural integrity. It also involves repairing damaged areas, and sanding to achieve a smooth finish. The result is a beautifully renovated kitchen at a fraction of the cost of replacing your cabinetry.
To prepare for your refinishing project, you must clear out everything from the cabinets and remove drawers and cabinet doors. Be sure to label each piece and put them aside for reassembly. It’s also a good idea to remove any appliances or countertops that could be affected by the process. Once the work area is cleared and protected, it’s time to begin. Before you start sanding, you should wipe down the surfaces to remove any grease or grime that may prevent the cabinets from receiving an even and consistent coat of paint. It’s best to use a degreaser such as trisodium phosphate (TSP) mixed with water. This cleaner will emulsify the grease and remove it more easily than soap alone. Be sure to open windows for ventilation and wear gloves to protect your hands from the harsh chemicals.
Once the sanding is complete, you can apply a primer to prepare the surface for a fresh coat of finish. Choose a high-quality product such as KILZ 3(r) Premium Primer, which is easy to apply and dries quickly. After applying the primer, you can sand it again to achieve a smooth and even texture before applying your desired finish.
Once your cabinetry is finished, it’s a good idea to seal it with a quality product such as polyurethane. This will protect the finish from moisture and stains, and will extend the life of your cabinets. It’s a worthwhile investment that will add to the value of your home and help maintain its beauty for years to come.
Preparation
Before the refinishing process, you need to prepare your cabinets. This is crucial to ensure a smooth and efficient renovation experience. To minimize disruptions, you should start by moving all cabinet hardware to a temporary area. You should also clean the cabinets and sand them, if needed. This will help you achieve a beautiful and flawless finish.
If you are going for a lighter finish, you may need to strip the existing stain. This is a time-consuming and labor-intensive task. It is recommended that you hire a professional to do this work for you. However, you can save yourself some money by stripping a small area in an inconspicuous location first. This will allow you to determine whether this method is right for your cabinets.
Once you have stripped the cabinets to bare wood, you will need to sand again. This will create a rough surface that helps the primer adhere to it. It is important to sand carefully to prevent creating dents and grooves in the finished product. Once you have sanded, use a vaccum to remove the dust and wipe the cabinets with a tack cloth. You should also wear a respirator and a mask to avoid inhaling the dust particles.
Next, you need to prime the cabinets. A high-quality primer will promote better adhesion and will prevent moisture from damaging the surface. It is also crucial to use a stain-blocking primer, which will protect the cabinets from stains and water damage. You should also sand the primer lightly to ensure an even texture.
After priming, you can begin painting your cabinets. Be sure to apply several coats and let each one dry before applying the next. It is also a good idea to sand the surfaces between each coat of paint. This will help reduce sags and drips.
After the cabinets are painted, you can reattach the doors and drawer fronts to their frames. If you numbered the pieces when you removed them, this should be an easy task. Once everything is in place, you can enjoy your newly-refinished cabinets!
Results
Cabinet refinishing results in an updated appearance and longer-lasting durability than repainting. It can hide minor wear and tear, blemishes, and cracks to give your kitchen a fresh new look. A professional can perform this service with skill, precision, and careful attention to detail, resulting in beautiful results that will last for years to come.
The process begins with stripping the old finish and repairing any damage. Then the cabinets are sanded and re-stained to your desired color. This can work for wood or even MDF (medium-density fiberboard) cabinets, but it is important to choose the right stain to ensure the new color looks natural and attractive. The best stains also provide excellent resistance to wear and moisture.
This type of surface-only refurbishment can be done much more quickly than a full replacement, and it may cost less. However, it doesn’t address structural issues and it may not be as customizable.
In addition to refinishing the cabinet doors, other elements of the kitchen can be refreshed to enhance your overall look. For example, you can upgrade your hardware with more decorative knobs or pulls. You can also opt for new hinges that are more durable and allow for easier opening and closing.
Refinishing your cabinetry can be a great way to get an updated kitchen without spending a lot of money. It can be a challenge, but when the work is completed, you will have a beautiful kitchen that will last for years to come.
The most important thing to remember when refinishing your cabinetry is to let the professionals do the job properly. This can make the difference between a job that lasts for several years or more and one that fails prematurely. Inspect your cabinets regularly for signs of wear and tear, and have any problems addressed promptly to avoid costly repairs down the road. By following simple cleaning tips, avoiding harsh chemicals, and conducting regular inspections, you can extend the life of your cabinetry.